 |
| via |
Wednesday, November 16, 2011
food | salted caramel shortbread bars
Maybe you've heard of salted caramel. It's only INCREDIBLE. My first experience was with the salted caramel mocha at Starbucks and, well, I was a tad apprehensive. Seriously, big chunks of salt floating around on the top of my drink? But, when you have a coupon to try one for free, you just don't complain too much.
If you know what I'm talking about, then you have to try salted caramel shortbread bars. A few recommendations, put the pan in the freezer between each layer and again before you cut the bars. Keep in the fridge until immediately before serving, they get soft very quickly. The bars are pretty rich so cut them really small, even smaller then you think you should, and they'll be just the right size.
Monday, November 7, 2011
sew | halloween costumes
I am a big fan of homemade halloween costumes. My mom always made our halloween costumes when we were little, and I took over making some of the costumes after I learned to sew when I was 7. I haven't really had time to make costumes since before college so it was fun to get back into it this year.
I thought it would be fun for us to dress up as a shark/lifeguard combo, and since I would rather be warm and Isaac would rather be cold, I figured Isaac could be the one to wear his swim suit in October.
I found some shark-perfect gray fabric on sale for $1.00/yard at Walmart. Total cost for the shark costume was $7 (4 yards of gray fabric and 2 yards of heavy interfacing, I already had thread and elastic for the bottom). I painted Isaac's lifeguard t-shirt with red fabric paint and picked up a whistle for $1.99 from the hardware store. Total Halloween cost = $8.99 for two costumes.
I didn't have a pattern so I penciled a basic shark shape on the length of fabric and sewed the tube shut with a pointed top. I cut a hole in the side of the head for the mouth and used extra stiff interfacing to make the teeth. I ran a length of elastic through the bottom of the shark to taper the body, and to finish him off, I used black and white circles of paper to make the eye. Voila, Fred the shark is ready to go and hungry.


food | homemade naan
Not long after we moved to Fort Wayne, we had the opportunity to try out a little hole-in-the-wall Indian restaurant called Taj Mahal. All the food was fantastic but we especially loved their garlic naan. So you can imagine my joy when, while browsing Pinterest, I found a recipe to make naan at home.

This weekend I finally had the opportunity to try it out and let me tell you, it is well worth the extra effort. Amazingly soft, pillowy, and all around delicious. I made a simple beef curry in the crockpot to enjoy along with rice and the naan last night. However, you can also use naan for personal pizzas, flatbread sandwiches, etc. I used one to make a pizza for Isaac's lunch today and it worked perfectly -- soft but crispy around the edge and the most perfect garlic flavor.
I highly recommend trying these recipes, the curry was super easy and would be great for a quick weeknight crockpot meal--especially since you can make the naan ahead of time. The naan really doesn't require much hands on time but it does need to rise for about an hour, so don't start this one unless you have at least an hour and a half. You can't make naan without garlic butter, it's just wrong. And finally, if you don't have curry powder (like me), you can easily make your own using spices you probably already have in your kitchen.
Homemade Naan
Garlic Butter
Crockpot Beef Curry
Create your own curry powder
Thursday, October 13, 2011
home | bedroom update II
Our bed frame is now painted! I love having the frame and nightstands in the same color -- I think it helps all our mismatched furniture to look much more cohesive.


I have a rare day off tomorrow and one thing I would like to accomplish is a Fall inspired table centerpiece. If you have any ideas or recommendations please send them my way!


I have a rare day off tomorrow and one thing I would like to accomplish is a Fall inspired table centerpiece. If you have any ideas or recommendations please send them my way!
Monday, October 10, 2011
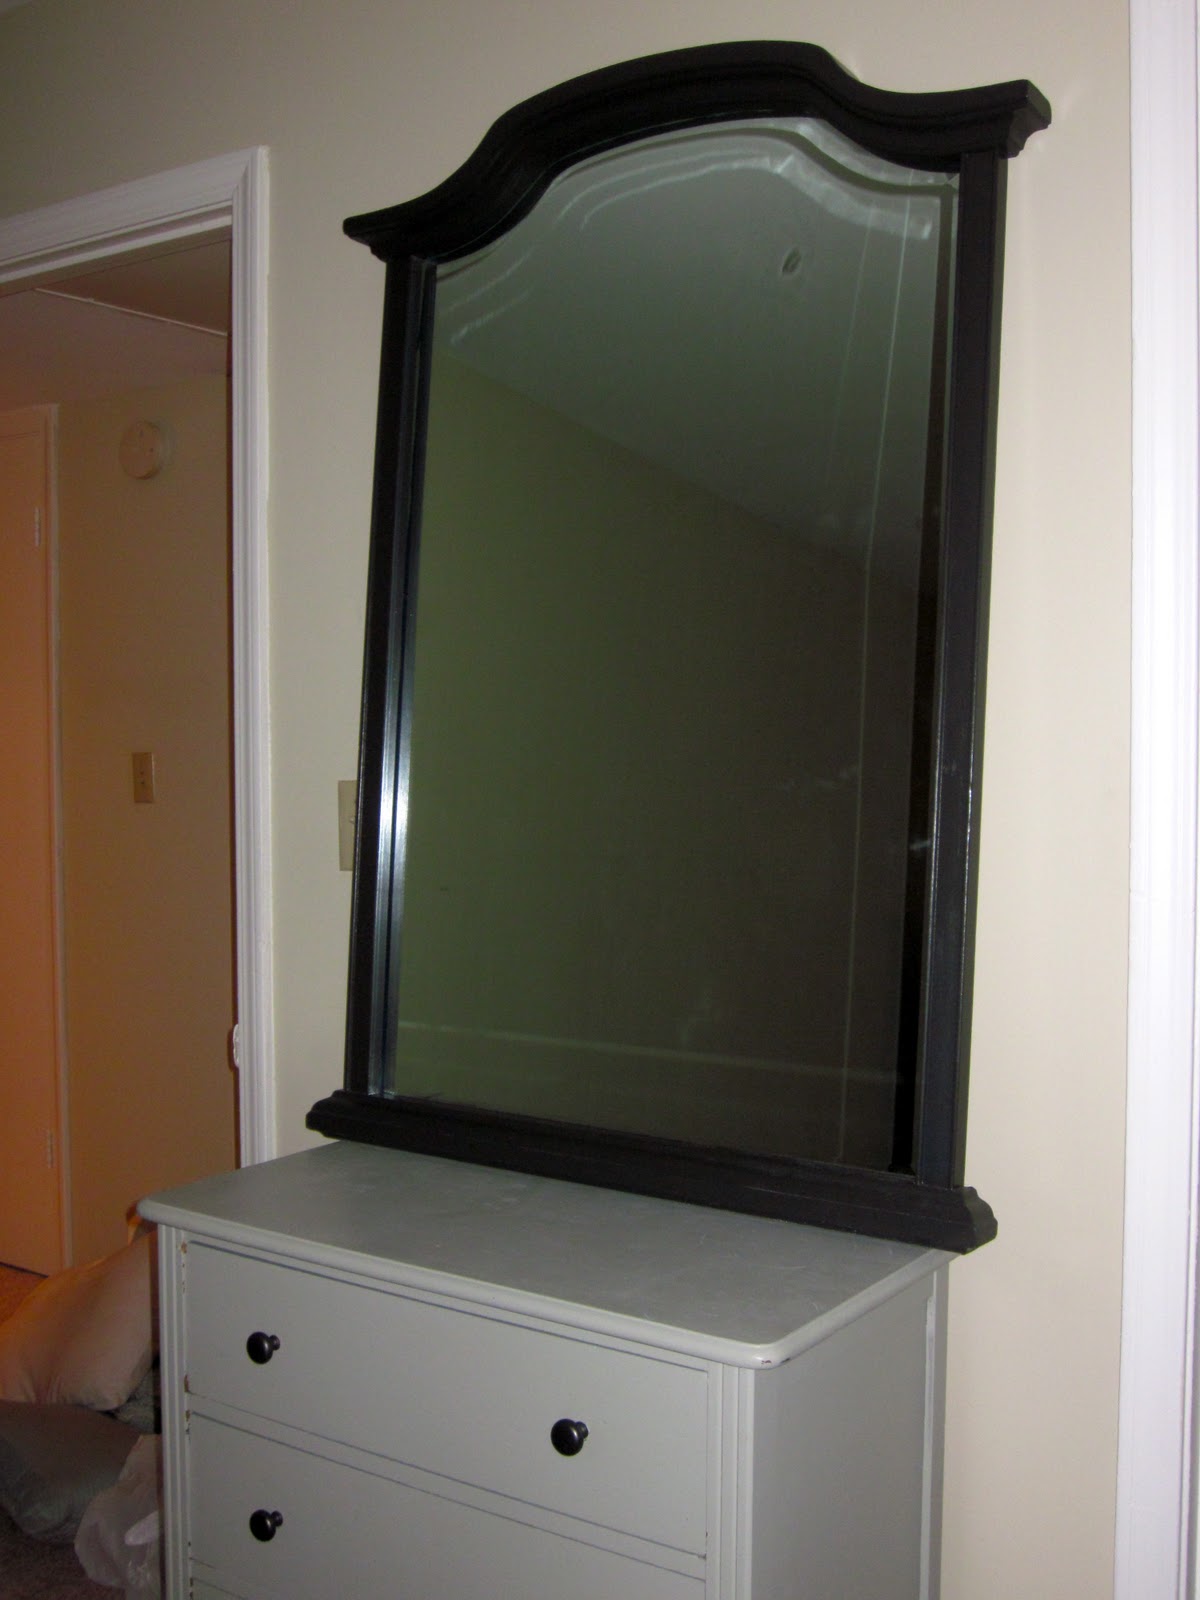
home | nightstands/bedroom update
As you may remember, we have been on the lookout for nightstands for several months. We wanted two matching nightstands for under $50, thus I figured whatever we ended up with would probably need some work. I had been watching craigslist and checking garage sales for about 5 months when I found these diamonds in the rough:


Solid wood, good construction, cheap, and electric blue. I love blue, it's my favorite color,
but these babies were BLUE. Like give you a headache if you look at it for too long blue. The picture doesn't even really do it justice, it was even brighter in person. They came as a set with a gorgeous mirror (also in, what I affectionately refer to as, "headache blue") and a large dresser. Since we already have dressers, I asked if they would consider selling the nightstands separately and we agreed on $40 for both night stands. I ended up taking the mirror home for free since the garage sale was ending soon!


I chose charcoal paint because I wanted a dark color but I didn't want jet black. I wanted something a little warmer, smokey almost, but not gray. This color is definitely black, just softer. We already have light gray dressers and I wanted something that would coordinate but add some depth since we also have light colored walls.

I also changed the cheap-looking white plastic handles to brushed silver. Big improvement.
Even with the addition of the new nightstands, I've been feeling a little blah about our bedroom and wanted to update without spending a lot of money. Basically trying to figure out how I could work with all our existing colors and linens but still update the look a little. While browsing around the clearance wall at TJ Max last week, I happened to find a beautiful green quilt for $20 and a set of two pillow shams for $5. With the addition of the printed shams and the punch of green from the quilt it really brightens up our room. The quilt is also the perfect weight for Spring/Fall when it's still too warm for the down comforter but not warm enough for just a sheet.
 Our new pillow shams remind me a lot of this gorgeous Pottery Barn Floral. Unfortunately, two shams = $78.
Next on the project list is painting our bed frame to match the night stands. Although we originally stained the bed, I wasn't completely happy with how the finish turned out. Pine boards take stain unevenly, even when using wood conditioner, and the effect is a little too rustic for my taste.


but these babies were BLUE. Like give you a headache if you look at it for too long blue. The picture doesn't even really do it justice, it was even brighter in person. They came as a set with a gorgeous mirror (also in, what I affectionately refer to as, "headache blue") and a large dresser. Since we already have dressers, I asked if they would consider selling the nightstands separately and we agreed on $40 for both night stands. I ended up taking the mirror home for free since the garage sale was ending soon!


I chose charcoal paint because I wanted a dark color but I didn't want jet black. I wanted something a little warmer, smokey almost, but not gray. This color is definitely black, just softer. We already have light gray dressers and I wanted something that would coordinate but add some depth since we also have light colored walls.

I also changed the cheap-looking white plastic handles to brushed silver. Big improvement.
Even with the addition of the new nightstands, I've been feeling a little blah about our bedroom and wanted to update without spending a lot of money. Basically trying to figure out how I could work with all our existing colors and linens but still update the look a little. While browsing around the clearance wall at TJ Max last week, I happened to find a beautiful green quilt for $20 and a set of two pillow shams for $5. With the addition of the printed shams and the punch of green from the quilt it really brightens up our room. The quilt is also the perfect weight for Spring/Fall when it's still too warm for the down comforter but not warm enough for just a sheet.
 |
| Before |
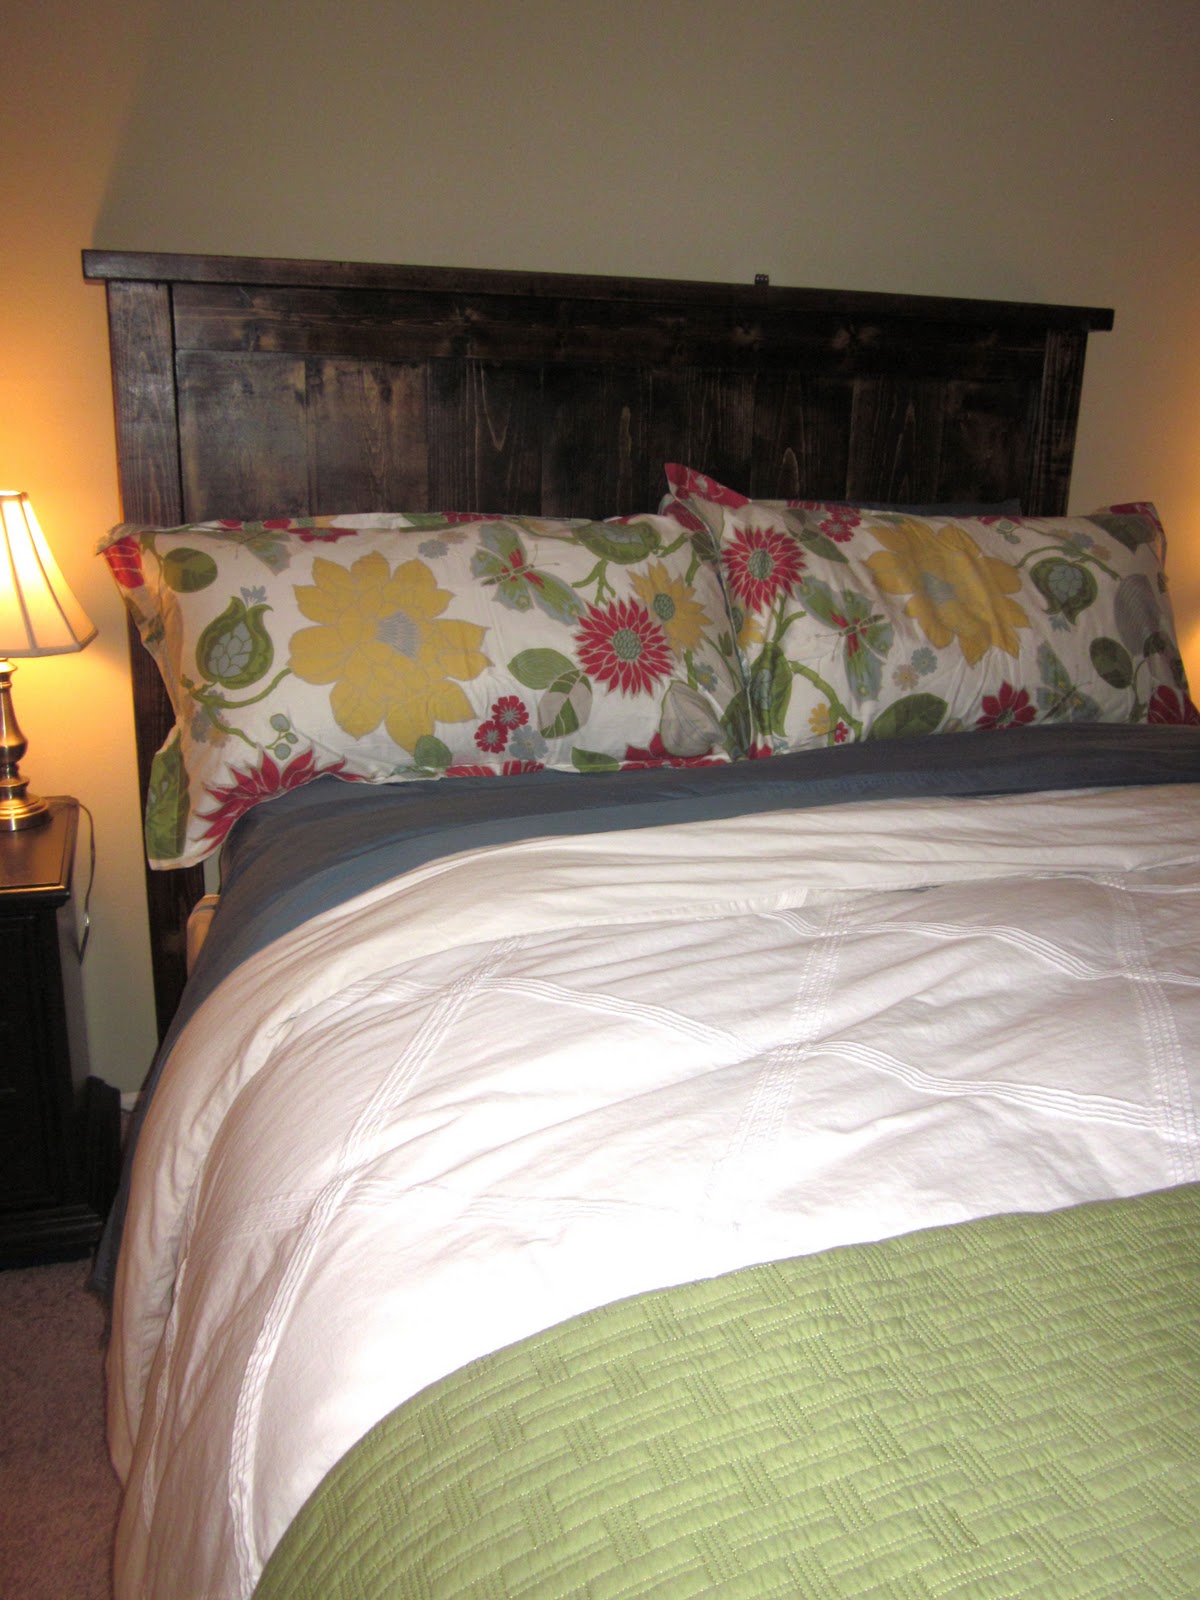 |
| After |
Next on the project list is painting our bed frame to match the night stands. Although we originally stained the bed, I wasn't completely happy with how the finish turned out. Pine boards take stain unevenly, even when using wood conditioner, and the effect is a little too rustic for my taste.
Monday, September 26, 2011
craft | meal planner
I've tried out quite a few meal planners over the past two years. Weekly, monthly, print-at-home templates, scribbled on a piece of scrap paper, etc. I'll be honest, some were better then others. Then I found this printable template from The Project Girl -- half the page is a Sunday - Saturday meal planner with fill in boxes, the other half is a categorized shopping list. I decided to spruce it up a little with some lamination and personalized meal magnets. I made a document with a list of most of the dinners we make on a regular basis along with a couple extras like "date night", "try a new recipe", and "leftovers". I printed, laminated, and attached magnets to each rectangle so that meals can be arranged and rearranged as needed.


To make your own meal magnets, create a Word or Publisher document and add text boxes approximately 1in by 3.25in. Add your own meals and adjust font size, color, and style to suit your preferences. Print, laminate, cut, and assemble.
Thursday, September 22, 2011
food | white chicken chili
Now that it is getting cooler outside, I've been looking for some new Fall recipes. A few days ago, I was talking with a friend who recommended white chicken chili...yum! So yesterday I found a fantastic Taste of Home recipe with the perfect amount of spice and heat. Not so much that you can't taste anything after eating it, but enough that it has great flavor and makes you feel really warm and toasty. You can find the original recipe here, but I changed a few things in the batch I made last night.

Kaite's version of White Chicken Chili
Ingredients:
1 pound boneless skinless chicken breasts, cut into 1/2-inch cubes
1 medium onion, chopped
1-1/2 teaspoons garlic powder
1 tablespoon canola oil
1 - 2 (depending on preference) cans great northern beans, rinsed and drained
1 can whole kernel corn
1 can (14-1/2 ounces) chicken broth
2 cans (4 ounces each) chopped green chilies
1 teaspoon salt
1 teaspoon ground cumin
1 teaspoon dried oregano
1/2 teaspoon pepper
1/4 teaspoon cayenne pepper
1/2 cup sour cream
1/3 cup heavy whipping cream
Directions:
In a large saucepan, saute the chicken, onion and garlic powder in oil until chicken is no longer pink. Separate aproxomitely half the beans and mash in a bowl until chunky. Add the whole beans, mashed beans, corn, broth, chilies and seasonings. Bring to a boil. Reduce heat; simmer, uncovered, for 30 minutes. Remove from the heat; stir in sour cream and cream. Divide into bowls and sprinkle a little shredded cheese on top.
By mashing half of the beans before adding them to the chili, you can reduce the amount of sour cream and heavy cream from the original recipe to make it a little healthier but still have a nice creamy chili. I added a can of corn to my chili just to get another vegetable in there, but you can add whatever you have on hand: frozen carrots, chopped roasted cauliflower, etc. It may not be the most traditional, but it does make it a little healthier and very filling.
Wednesday, September 14, 2011
sew | roll-up shopping bag
I found this roll-up shopping bag tutorial on Pinterest and decided to give it a try for my mom's birthday. I loved the finished product so much I've made four more since then (one huge one for me to use at the grocery store and three as gifts).
I love how the size is completely adjustable depending on your needs and yet, no matter how big you make the bag, it rolls up to about the size of a fist. This makes them ideal for hauling library books home, grocery shopping (or any shopping), and travelling (since they are approximately the size of a pair of socks, throw in two or three in case you need an extra bag or two for the trip home).
I was so excited to get the birthday bag in to mail to my mom I completely forgot to take a picture of it. However, I did manage to take a few pictures of the other bags:
These bags are really easy to make but I strongly encourage that you don't skimp on the French seams. They take a little extra time but make the bag so much stronger (and they look nicer too!). I didn't know how to do French seams before this project but she walks you through it in the tutorial. If you're still a little confused (like I was) Google "how to sew with French seams" and you'll find a ton of detailed explanations.
I love how the size is completely adjustable depending on your needs and yet, no matter how big you make the bag, it rolls up to about the size of a fist. This makes them ideal for hauling library books home, grocery shopping (or any shopping), and travelling (since they are approximately the size of a pair of socks, throw in two or three in case you need an extra bag or two for the trip home).
I was so excited to get the birthday bag in to mail to my mom I completely forgot to take a picture of it. However, I did manage to take a few pictures of the other bags:
 |
| Here are the three yet-to-be given-as-gifts bags all rolled up (I don't want to ruin the surprise of what they look like for the people who will be receiving them) |
 |
| My jumbo bag |
 |
| All rolled up |
These bags are really easy to make but I strongly encourage that you don't skimp on the French seams. They take a little extra time but make the bag so much stronger (and they look nicer too!). I didn't know how to do French seams before this project but she walks you through it in the tutorial. If you're still a little confused (like I was) Google "how to sew with French seams" and you'll find a ton of detailed explanations.
food | lemon curd
A few weekends ago, we had our first guests in our new apartment - our dear friends Victoria and David. Victoria and David both love to cook (as do I, though I'm not as creative as they are) and Isaac loves to eat so we had a wonderful weekend with lots of delicious food. One thing I absolutely had to share was Victoria's lemon curd recipe (which we enjoyed with angel food cake and strawberries). I don't even usually like cake, I don't hate it, but if given the choice between cake and some other dessert I will almost always choose the non-cake option. In fact, growing up I never asked for cake on my birthday (unless it was an ice cream cake, those are great!), I would ask for pie or grandma's cherry delight. However, Victoria's angel food cake with lemon curd is what I will be requesting for every birthday from now on. Seriously, this cake is really that good.
It looked a lot like this but instead of spreading the lemon curd between the layers, we just drizzled it over each slice. Unfortunately, we don't have a picture of our actual dessert because we ate it up so fast.

Start with an angel food cake mix and prepare and bake according to directions.
While cake is baking, prepare the lemon curd.
Victoria's Lemon Curd:
3 TBLS. Grated lemon zest
3 lemons (to equal 1/3 cup of fresh lemon juice)
5 egg yolks
1 cup sugar
1/2 cup (1 stick) butter, chilled.
Mix yolks, sugar, zest, and lemon juice. Put in double boiler or heavy bottomed saucepan. Slowly cook, stirring continually, until mixture thickens or to 170 degrees. Should be able to coat the back of a spoon well. Take off heat and stir in small pats of butter one at a time. Place in fridge.
Victoria says that it isn't that complicated but it does take patience because you have to stir and watch and stir and watch the whole time it is on the stove.
Enjoy with fresh fruit and the angel food cake!
It looked a lot like this but instead of spreading the lemon curd between the layers, we just drizzled it over each slice. Unfortunately, we don't have a picture of our actual dessert because we ate it up so fast.
Start with an angel food cake mix and prepare and bake according to directions.
While cake is baking, prepare the lemon curd.
Victoria's Lemon Curd:
3 TBLS. Grated lemon zest
3 lemons (to equal 1/3 cup of fresh lemon juice)
5 egg yolks
1 cup sugar
1/2 cup (1 stick) butter, chilled.
Mix yolks, sugar, zest, and lemon juice. Put in double boiler or heavy bottomed saucepan. Slowly cook, stirring continually, until mixture thickens or to 170 degrees. Should be able to coat the back of a spoon well. Take off heat and stir in small pats of butter one at a time. Place in fridge.
Victoria says that it isn't that complicated but it does take patience because you have to stir and watch and stir and watch the whole time it is on the stove.
Enjoy with fresh fruit and the angel food cake!
Sunday, September 4, 2011
style | look alike fashion for Fall
I've never really been on top of the latest trends or styles, but I do love to shop. Thankfully I have many friends (and three stylish sisters) who are in the know and do their best to point me in the right direction (check out Mary's blog for great fashion posts). For example, I vehemently refused to try skinny jeans for years. I though that, given my hip to chest ratio, I could never ever ever wear them. I tried on my first pair not that long ago, and it turns out that they are the best fitting (and looking, if I do say so myself) jeans I have ever owned.
So now I try to keep abreast of what's going on out there in style land. After perusing the J. Crew website and catalogue for Fall style ideas that were unfortunately out of my price range, I discovered a few look alike pieces from Target.
I'm really loving stripes for Fall -- this top from J. Crew was top of my list until I found this almost identical one from Target (for almost half the price!).
 I bought the Target version, and I love the fit and color -- great with skinny jeans for Fall. I don't usually go for sequins, but I really like the detail at the shoulders. It dresses up an otherwise plain tee.
I'm also loving structured dresses like these two from J. Crew and Target.


So now I try to keep abreast of what's going on out there in style land. After perusing the J. Crew website and catalogue for Fall style ideas that were unfortunately out of my price range, I discovered a few look alike pieces from Target.
I'm really loving stripes for Fall -- this top from J. Crew was top of my list until I found this almost identical one from Target (for almost half the price!).

I'm also loving structured dresses like these two from J. Crew and Target.

Chances are, if it has a ruffle, I'll like it. These cardigans from J. Crew and Target are no exception.

Happy shopping!
Monday, August 22, 2011
build | our new bed
This is a basic overview of how we built our bed. Visit Ana White's website for the actual plans for our bed and many other projects.
Back story: shortly before we got married I found a free Ikea bed frame on craigslist. It wasn't much to look at but, hey, it was free. It was exactly what we needed (being free and all), but it wasn't in the best condition to begin with, and by the time we were getting ready to move to fort Wayne several of the screws had started stripping out of the wood composite. We knew it probably wouldn't survive another disassembling and reassembling, so I started looking around for a new bed. We didn't really want to go the Ikea route again (as much as I love Ikea), but every solid wood bed I found was waaaay out of our price range. I tried craigslist, garage sales, and furniture stores, but we didn't see anything that we actually wanted in our bedroom for under $200 (the approximate cost of a new ikea bed frame and our backup if we couldn't find anything else). I knew about the Ana White website and started seriously considering the merits and difficulties of trying to build our own bed.
I have a sincere love of all things Pottery Barn but a garage sale budget, so I figured it was at least worth a try. Once I decided on a design, I got the go ahead from Isaac to purchase the lumber. For about $100 I got all the lumber we needed, plus another $20 in nails, screws, and stain.
Isaac and I worked on the bed in the evenings after work for about a week. It did take us a lot longer then the plans state (which we were expecting), but it was a lot of fun working on it together. Because this is a physically large project, we did find that two sets of hands were absolutely necessary for the construction stage. Once we got the headboard and foot board together, I went to work sanding, prepping, and staining. I mixed one part ebony stain to two parts walnut to get our color, and once everything was stained I used a clear rub on poly to seal and protect. We did modify the original plan because the wooden frame Ana uses to attach the headboard to the foot board is rather permanent, and since we will probably be moving multiple times over the next several years, we knew we needed something more mobile. We ended up using a cheap metal bed support that screws into both the headboard and the foot board. It is incredibly sturdy yet very easy to disassemble and reassemble without damage to the wood.
The actual Pottery Barn Farmhouse bed $1,199
Our completed bed $120
Not a perfect match but close enough for me!
Sunday, August 21, 2011
home | our new apartment
We've been here a couple weeks now, and it really does feel like home. It happened a lot quicker than I would have thought -- I think jumping right into work helped a lot because it got us into a routine right from the beginning. I'm quickly finding my way around Fort Wayne (it actually reminds me a lot of Omaha), and it's nice being in a larger area, though I do miss Hillsdale and being able to walk everywhere.
As promised, here are a few pictures of our new place:
 |
| When you come in the front door you enter into the dinning area with the kitchen to the left. |
 |
| Our apartment has a little galley kitchen but I am amazed at how functional it is -- tons of cabinet space, well laid out, and a nice large pantry. |
 |
| The dinning area opens into the living room. |
 |
| This hutch was holding books in our bedroom at our old apartment because we ran out of bookshelves. I'm very thankful for the built in bookshelf in our new living room so the hutch can now hold all our glassware! |
 |
| I'm excited (though happy to wait) for cool weather so we can try out the fireplace. :) |
 |
| The aforementioned built in bookshelf -- probably my favorite feature of the whole apartment. |
 |
| Down the hall from the living room you will find the spare bathroom on the left. |
 |
| The spare bedroom/office has a corner for me to work on projects and take care of mail and papers. |


Isaac had an old office chair that he didn't need anymore so Victoria helped me spruce it up while she was visiting us this weekend. :)
 |
| Because our new kitchen is fairly small, our kitchen cart didn't fit. However, it works wonderfully as a storage cart in the closet. |
 |
| I saw something like this on Pinterest -- just find a plastic bin with holes and feed the ends of ribbon through for easy and tangle free access. |
 |
| If you come visit this is where you'll sleep. :) |
 |
| Isaac has a study corner too -- he has already made good use of it and taught himself Hebrew over the past two weeks in preparation for starting at the seminary! |
 |
| More books. lol |
|
| Our bedroom is a work in progress -- we are currently on the lookout for nightstands. We love our new bed! |
 |
| Our bedroom opens into a walk through closet/vanity and master bath. |
 |
| Vanity |
 |
| Storage |
 |
| On my side of the closet we installed a rod from Ikea ($2.99) and used hooks to hang jeans and pants. It is behind the hanging clothes and makes good use of previously wasted space. It also keeps all my pants wrinkle and crease free! |
 |
| My side of the closet. |
 |
| Isaac's side of the closet. |
 |
| Our bathroom. Hopefully I'll be back to posting more regularly now that we're settled in. I'm looking forward to sharing some of the projects that I hope to complete in our new apartment! |
Subscribe to:
Posts (Atom)